Ema Hossain Design Portfolio

Take a look at my other blog EmaHossainDesign Portfolio to see more about my design work

Inspired by microbes

I have been really suprised by just how much I have enjoyed  making accessories inspired by microbes and cell biology.

After years working in a microbiology lab, then several as a science teacher , I  left  my career behind for stay at home motherhood and thought I had left microbes and science behind , but recently I have been getting lot of science, geeky , microbes and biology inspired inspiration.
The newest additions are these cell biology inspired brooches in their own little petri dishes!


I have used Liberty print fabric and beads for this cell brooch


This one has a lovely Vintage button sewn onto felt to represent a cell nucleus


I have also designed and made necklaces like this one above


This brooch has the added texture of mohair wool 

They are a great addition to the rings that are already in my Folksy shop


customising girls clothes

I used to love clothes shopping and it used to be relaxing and fun especially when it was sheduled in with some girly chat and lunch with my best friends. These days with 3 young children clothes shopping is mainly done in a mad rush or over the internet. I also hardly find anything I like for the girls. The kids departments of many stores are filled with skirts that are too short and tops too skimpy or everything is just a mini version of grown up fashion. Even a simple t-shirts isn't so simple, there is too much emphasis on fashion styling and logos.

So this week I decided to customise plain t-shirts for my 4 year old daughter. A pack of t-shirts cost me £6 and the fabric scraps I already had and here are the results!!

The pretty  little designs on plain t-shirts mean they go with more or less everything, these tees will look fab with trousers or a skirt.

It's so easy too, it hardly took any time at all. First I attached the scraps with wonder web and an iron. Then proceeded to randomly sew around the shapes with straight stitching or a zig zag stitch which is great for sorting out fraying and creating a strong edge.


Here I used a piece of white frayed edge linen and the added the Liberty fabric heart to it.

 Here I have left the edged to fray a little from wear and tear to add an interesting edge

Here I have used a zig zag and a stright stistch to create some definition.
With so many stitch options it would be easy and fun to play around and create alot of detail and interest.

The t-shirts look great and my daughter loves them.


I also turned a pair of old jeans into a pretty girly skirt for my daughter. The jeans were a basic range pair which cost a couple of pounds and were no longer worn by her sister. I cut off the bottom where the legs are and attached a pretty skirt of Liberty print fabric and it's become a firm favourite.


It looks so girly and sweet and cost a fraction of the similar styles that are in the shops and ofcourse so much nicer!!


hand built and hand painted pottery

This post is a visual record of some of the hand built and hand painted pottery I did over ten years ago.  They have been mostly neglected, one in the garden gathering cobwebs, a couple with a few cracks  so I decided it would be good to photograph them and put them here as a record for myself.

One of the first things I made was this decorative fish tile. The first hand building technique we were taught was slab making.


I also experimented with these colourful coasters


One of my favourites because of the way the colours have come out is this little hand made bowl


This hand built bowl is a  favourite too, here you can see the front with engraved flowers in earthy colours


and the bottom with engraved lines


This one has a fluted edge and flowers engraved into the base, this one has got a bit weathered from being left in the garden


This hand painted bowl was a ready made white ceramic and my design is based on water , mountains and greenery


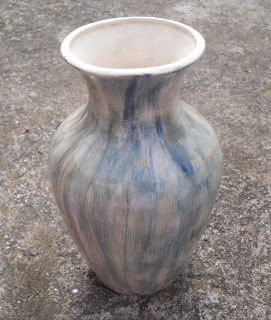
I've used this regularly as a fruit bowl.  This vase has now got a crack near the base but I love the colours and it now sits in the garden


This salt pig didn't quite come out as planned but I love the organic feel and the colour and grainy texture of the finish.


Hand building pottery is alot of fun, very tactile and easy to built something spectacular with hardly any tools it's definately something I'll be trying again, this time with the kids!

A beautiful and different wedding bouquet

My little sister Momtaz had her big day in December and what a day it was, full of everything that celebrates her amazing personality and love of handmade things, which she has described on her blog. Early on in the planning stages she had asked me to make a bouquet. There was nothing unusual about that as I had made my own and all the flower bouquets for my other sisters.

Then she said she didn't want real flowers but wanted to use beads, buttons and bits of old jewellery and that they would be donated by her friends! So there wasn't really going to be a way of planning it yet but I was excited by the idea! Truth is I hadn't really done any beading or jewellery making for years and I certainly wasn't a dab hand with a pair of pliers but I love a challenge so ofcourse promised her it would be fabulous!!

I did have a collection of photos for the work in progress for the bouquet but unfortunately I had a problem with my old laptop and lost them all ! ( I know.. I know.. I must always back up.. back up.. and back up some more!!) I did want to share how I had made the bouquet from start to finish but instead I can show you how fabulous it looked on the day and some photos of the stages involved.

There were all sorts of exciting things to work with: strings of seed beads, metal beads, wooden beads, enamelled flowers and lovely vintage buttons, pearly shiny beads and a gorgeous shimmery butterfly brooch which a  friend had bought be years ago but was now damaged and couldn't be worn.

 a wonderful mix of jewellery and beads from broken sets donated by friends

fabulous clear vintage buttons from Momtaz's charity shop button box

some jewellery donated by me

some of the donated brooches, necklaces and beads

Rather than try the usual way of wiring on beads and buttons into a classic floral type arrangement, I decided to try something different  and I mean really different. I wanted a wow factor. Crystal bouquets are always amazing and have a wow factor but I had a surprise lined up, my bouquet was going to smell nice too!! For this I used the scented wicker circles you find in pot pourri mixes. I had no idea how I would hold these up in a bouquet arrangement, at first I thought I could probably join them to a stick of some kind.

Then soon after, oneday, on my way back from the school walk via Tesco's car park I found the perfect object! A brand new looking head massager! Just lying on the floor on the pavement. At first I walked past but them I had a light bulb moment and rescued it and used it as the structure to hold the balls in place!


this is the head massager!
This formed the supporting structure of the bouquet which held balls which were covered with beads and buttons, here are photos showing the early stages of the scented wicker balls.


The whole process worked quite well and though fiddly in places was well worth it. I also used feathers to create the final look that the bride wanted.

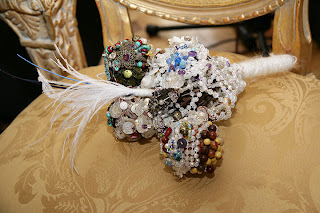
Here are some fantastic photos of the bouquet on the day! You can see some of the beads, buttons and the mohair yarn that I wrapped around the stem too.


 picture by Alexandre Pichon

picture by Alexandre Pichon

I'm very pleased with the way it turned out !! Ofcourse this bouquet couldn't be thrown up in the air, so for that there was another amazing bouquet to make. This time Momatz let me design whatever I liked so naturally I chose a peacock theme with a bit of pink, purple and winter wonderland white and a bit of sparkle.


Picture by Jolekha Shasha
I was also very happy with the fresh flowers bouquet, the feathers and ting ting and purple chiffon and diamonte detail were perfect and what's even more perfect was all the bits were already available at home in my craft box and the flowers were a few stems from a very cheap market bouquet which I bought for myself!

jewellery making

Over ten years ago I went to jewellery making classes. It was really interesting. We learnt to use saw cutters and solder and also bezel set stones. I found it fiddly and wasn't very good at it and the class was full of some really talented people who made amazing silver jewellery week after week, whilst I struggled to do a couple of pieces over the whole course, which were a ring and a large heart pendant set with gemstones.

This is the first ring I made, in copper, which was the metal we practised on.
The shapes have been cut with the saw

all though it looks random I had chosen shapes with a feng shui meaning

the shapes are hearts, circles, ovals and squares

My interest in jewellery making has been rekindled recently, although I don't have the time to do the silever and metal jewellery classes, nowadays there are so many readily available findings, beads and elastics on the market, that it's much easier to make your own rings, necklaces and bracelets with some basic skills, I am surprised it has taken me so long to have ago.

Here are a couple of rings I made recently with silver coloured findings and miracle beads which are definately my favourite beads, I love the shimmer and jewel colours of these.


They look great and more complicated to make than they actually are. I'm really pleased with the cluster ring as I've seen these in the shops for around £8-12 and think mine with all the findings cost a couple of quid and less than an hour to make.

I also added beads to a charm bracelets although I definately need to add more to make it look more exciting, it's not a bad start.


I think this year family, friends and the kid's school teachers will be getting some homemade jewellery gifts.