Ema Hossain Design Portfolio

Take a look at my other blog EmaHossainDesign Portfolio to see more about my design work

Floral table decoration

I made a cheap but lovely looking table decoration recently using two reduced bunches from the local supermarket and a white painted pail, from a pound shop.


The flowers and the pail cost £5, and the pail can be reused


Ready to begin


First, I removed the leaves from the flowers


Removing the leaves means it will stay fresher in the water for a bit longer

The centre of the arrangement was made by taking the centre rose stem then placing the other stems diagonally to it
Here is the second rose
The court one has been added here
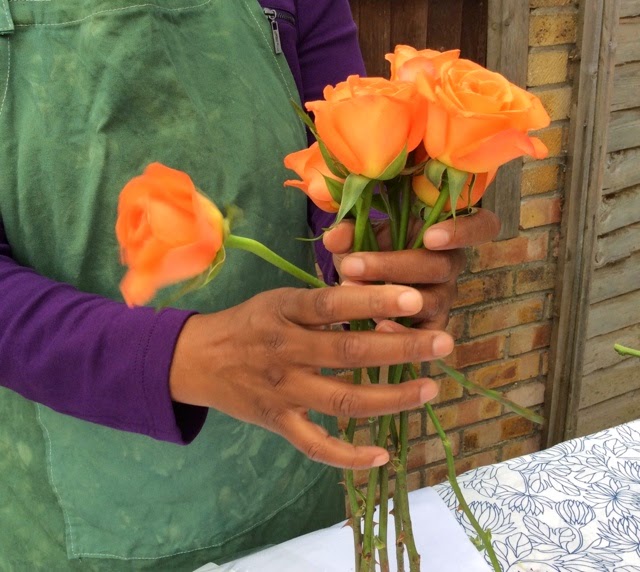
Florists have the technique mastered so they can create a fairly tight wrap, but you will see that you can still create a nice arrangement with loosely held one

Here are all the flowers in place and now to tie the stems together

I cut the string long enough to be able to wrap around the stems several times and tie it securely


If you have a go at this don't worry too much it your rose stems look like they are not staying together, once you have bound the twine around, you can gently nudge the roses and stems into place before making it securely held by the string.


I wrapped the string around several times 


Now I can begin to add the chrysanthemum flowers


I arranged the flowers around the edge of the roses, holding the stems in place


The contrasting colours look pretty together


The final arrangement will look like this


I secured with a little more string and then cut the stems down so that they would fit the white display pail

 
Here it all looking simple but lovely, you can Ofcourse add more decorations to the pail, maybe tie ribbons around it


I had made this lovely decoration  for my sister to give her the next day.
I decided to give the flowers as a posy and keep the pail for more flower arrangement making.
I kept the flowers overnight in water and the next morning wrapped them I tissue paper and ribbon making a delightful floral gift which she loved.


my new work apron

I dyed a plain cream cotton apron in the green dye bath used yesterday. After the t-shirts had been removed, I put the apron in,  however I did not wash or stir the apron in the dye bath, and this created a blotchy look.
Blotchyness is caused by not mixing well and also if the sizing on the fabric applied by the manufacturer has not been washed out.

This could be rectified by washing the apron, removing the dye and redye-ing however, I decided to keep it as it is, it looks like an old well used apron instead of a new on, which I liked.


My green hand dyed work apron


Tie dye t-shirts green onto pink

Here I am creating a subtle tie dye pattern on t-shirts that have already been dyed shades of pink. I had some green powder left and decided to see what the effect would be.


The t shirts were folded and tied with string


I used half a packet of dye but still added the required amount of salt as that salt helps the fabric pores open up so that the dye can bond to the fabric.


I made up the dye bath, in a small true outside in the garden

The t shirts were added and left in the bath for a few minutes

I removed them after 5 mins


I didn't want to colour them green but just add a tint, so then 


Placed them in another trug

Adding water to wash off excess dye


Then they were ready to be taken out and squeezed


You can see how the folds and tied areas took up a different amount of dye, creating the look


Here are the two t shirts drip drying before washing.
If I had kept them in longer the patterning would have looked stronger but the pink would have also lost brightness.


Tie dyed socks


Tie dyeing is fun, the surprise effects and the one off patterns of randomly tying the elastic is really enjoyable. I have been thinking about tie dying children's socks for awhile and yesterday I had ago with some left over red and blue dye. I  am really pleased with the results.


I started with white cotton socks


I randomly wrapped elastic bands onto the pairs to create tie dye patterns


Here is my little helper with some of the equipment used: troughs, salt and dyes


The tie dyed socks were placed in the dye baths

The colour was taken up very quickly and I didn't keep the socks in for long, about ten minutes.


I then undid the elastic bands 


The colour looks vibrant but to have a vibrant colour you need to dye for longer and use more dye, I expected the final colour to be much lighter after the rinse and wash.

The socks were rinsed in a bucket of cold water to remove excess dye, then put into the washing machine for a wash at 30 degrees with washing liquid and dried overnight on a rack.

Here is the end result.
Sweet, candy floss and raspberry ripple and  blueberry shades created with red and blue dye.


I am thinking of making some more and putting them in my folksy shop and maybe even having a stall at the school's summer fayre. 


Gelatine plate mono-printing


I have just started reading a great simple printmaking book by Elizabeth Harbour.
One of the techniques she describes is using a gelatine printing surface (jelly printing surface).
It involves making a printing surface with powdered gelatine.
I was intrigued by this method of mono printing and decided to give it a go because beautiful prints can be made using flowers and leaves.


I scaled down the quantities stated in the book to make a small thinner block to try it out.
Here is the jelly plate when the gelatine had set.


I planned to use acrylic paint but didn't have the acrylic retarder which slows down the acrylic paint drying to allow the print to be made. It doesn't work without it 


The kids went into the garden and picked buttercups and grass, then I applied the acrylic to the gel plate and they placed the plants on the plate.

After making the silhouette print which is absorb off the background paint, we quickly removed the flowers ready to make the ghost print.


Unsurprisingly the acrylic had dried and stuck in patches to the newspaper we were using to do the silhouette print.  Not wanting to disappoint the kids, I explained that I needed to add something to the acrylic first but didn't have any but that we could try with watercolor paints to get and idea of what the print might have looked like.


I applied some green watercolor over the acrylic and the kids placed the plants on top.

We made a print and then I added a bit of blue paint and we did another layout.


The prints came out like this


The 3 print attempts with watercolor on the gelatine plate. It looks like a promising method and we are looking forward to trying it again when I get some acrylic retarder.


Lino cut gift tags


I have long admired lino printing a great way of printing something  unique and individual. This year I decided I had to have a go. I haven't really mastered the cutting and gouging tools yet but felt ready to attempt some lettering. I made the job easier for myself by using the soft cut lino
Here are the "Smile" gift tags I made.


I wrote the word out onto paper then placed it with the written side onto piece of soft cut lino.
The reverse lettering was traced over with a pen creating a gentle indent into the soft cut lino. 
I build on the lettering shape to make them wider and thus easier to cut around.


The idea is to use the tools to cut into the lino to remove the areas around the word , leaving the word area raised so that it picks up the ink and the background doesn't. You have to work safely and away from yourself as the tools are sharp. Since the lino block was small I was able to work on a tea tray to collect the small bits that are cut out by the tool. For larger pieces it is advisable to hold the lino piece in a lino cutting safety guard that holds the corner secure as you cut.


As I done a little to much gouging out,  I made a hole where the top gap of S is so decided maybe I would cut around the word itself. I wasn't sure the scissors would cut it but it did so fairly easily. The only thing is the area was now smaller and not as easy to handle. Ideally I would have glued it onto a block of wood to make it easy to handle but as I was experimenting I decided to keep it as it was.

I used acrylic paint dabbed on with a sponge placed the stamp on a card tag and then pressed down then gently lifted it off.

Not bad for a first attempt.


I am going to add these tags to the next parcel I wrap. I think matching wrapping paper with different coloured wording would look great with it.
 
Learn more
To find out more about how to lino cut safely read
Nick Morley's blog LinocutBoy
I purchased my lino cutting tools from Nick.
 

Paper flower magnets

I love making simple paper flower magnets using pretty patterned paper. It's very relaxing just going with the flow with some paper and glue and a cuppa at hand. An easy crafty activity  when you want something that will slow you down from the demands of a busy day.

These are some of the flowers I have made in the past and sold at my craft stall.


The roses have been made with some beautiful  Italian Carte Varese paper.

I have also made them out of recycled paper from old book pages and put them into groups to make magnets which look great on a workspace notice board or on the fridge.

I made these magnets using pages of old foreign language novel pages that were being discarded by the library.


Paper roses are really easily to make using lightweight paper, a quilling tool and some glue.

I will explain how I made the rose flowers for the trio of roses magnet.
I used the following bits


Cool glue gun and glue sticks suitable for paper, recycled paper, scissors, circle magnets, circular glue dots and a quilling tool are the necessary tools. You can use a circle template and pencil to get a perfect circle shape but the roses look better when the shape is a little uneven.


A large circle and two smaller circles were cut out for each rose. The large circle is the main rose and I used the smaller ones to give strength to the back where the magnet will be attached.


The circles were then cut into starting at one edge to create inward spiral movement with the scissors leaving a rough circle in the middle where the glue will be applied the curled spiral together.

The slotted quilling tool was then used to roll up the spiral twist.


The roses will look something like these above. 

You can secure the base with a sticky dot like I have done.


This holds it in place but you can go straight onto the gluing stage with the glue gun.
It is important to use a cool glue gun which uses cool glue sticks as these are suitable for paper. The hot glue gun and sticks is too hot for the paper.


Follow the instructions for your glue gun and cool glue sticks, they usually need about 3-5 minutes to heat the cool sticks to the right temperature. Work quickly as the glue cools quickly, once dry it is transparent so don't worry too much about being precise, that will come with practice.


You can glue a circle to the back of the rose, glue leaf shapes and then another  circle.
Experiment as much as you like, this is what I did. I cut into the leaves and glued a fringed strip to the back of the roses. I used the quilling tool to create some curls resulting in a trio of roses design.
I attached three self adhesive magnetic discs to the back of the design and here it is in close up.


The other magnet was made by quilling fringed strips and gluing them together with leaves.

Here are examples of other simple paper flower magnets which I made.


This one was made with several circles and they were cut into to create some curves and these were then glued and curved inwards, the magnetic circle added at the back

For this one I used a flower template and a gold card and finished it off with an acrylic gemstone.


You can make your own designs based on real flowers by using flower shape templates or creating your own petal shapes and gluing them together. The possibilities are endless and if you want them to have a protective coating you can paint over the paper with a clear gloss varnish.